
Relist selectively, optimize every relist for discovery, and never just copy-paste a dead listing back up. That’s the verdict. Here’s what to do right now:
- When to relist: Wait 30–60 days for slow-moving items; relist sooner (14–30 days) for high-demand or seasonal products.
- One change that moves the needle: Update your title with stronger search terms, swap in a better lead photo, or adjust price based on current comps — pick one and test it.
- Primary metric to watch: Sell-through rate. If impressions are healthy but conversions are flat, the problem is your listing, not your timing.
On cost: eBay gives you free auto-relists for auction listings (up to 8 times), but manual relists can trigger insertion fees depending on your monthly free-listing allotment and any upgrades you’ve added.
Key Takeaways
A smart eBay relist strategy pairs the right timing with a targeted listing edit and consistent measurement — not just putting the same listing back up and hoping for a different result.
| Point | Details |
|---|---|
| Diagnose before relisting | Check impressions, CTR, and conversion to identify the failure mode before making any edit. |
| Timing by item type | Wait 30–60 days for standard items; relist high-demand items every 14–30 days; hold seasonal items until peak season. |
| Auto-relist limits | eBay allows up to 8 free auto-relists for auction listings; vehicles are the main fee exception. |
| One edit per test | Change one variable (title, photo, or price) per relist cycle so you know what actually worked. |
| SpareDollar for scale | SpareDollar automates bulk relists, AI item specifics, and inventory sync across marketplaces from a single listing. |
Table of Contents
- What’s the difference between relist, sell similar, and GTC?
- What are eBay’s automatic relist rules?
- When should you relist, and how often?
- Step-by-step manual relist checklist that actually moves the needle
- How do relist tactics differ by listing type?
- What are your options for bulk relisting and automation?
- How SpareDollar helps you automate a smarter relist strategy
- How do you measure relist performance and improve over time?
- Common relisting mistakes that hurt your account
- Three relist strategy templates you can copy and test
- Sources
- FAQ
What’s the difference between relist, sell similar, and GTC?
These three options look similar in the Seller Hub interface but behave very differently, and picking the wrong one costs you watchers, search history, and sometimes money.
Relist reuses your existing listing’s item number and carries over most of the original details, including title, description, photos, and item specifics. You can edit any of those fields before relisting. Crucially, the listing retains its original item ID, which means existing watchers may receive a notification that the item is available again. Sales history from the original listing does not transfer, but the structural connection to the old listing remains.
Sell Similar creates a brand-new listing from scratch, using the old one as a template. New item ID, no watcher alerts, no connection to the previous listing’s history. Use it when you want a completely clean slate — for example, if the original listing had poor item specifics or a title you want to overhaul entirely.
Good 'Til Cancelled (GTC) applies only to fixed-price listings. eBay automatically renews them every 30 days and charges a new insertion fee each cycle (if applicable). GTC listings don’t “relist” in the traditional sense — they just keep running. The trade-off is that a listing that never sells can quietly accumulate fees and lose search freshness over time.
A quick comparison of outcomes:
- Relist: Same item ID, watcher alerts possible, editable before going live, fees may apply.
- Sell Similar: New item ID, no watcher carryover, full fresh start, fees apply as a new listing.
- GTC: Auto-renews monthly, no manual action needed, but no freshness signal from a new listing event.
The practical rule: use Relist when you want to preserve continuity and alert watchers. Use Sell Similar when the original listing was fundamentally flawed. Use GTC when the item sells regularly and you just want it to stay live.
What are eBay’s automatic relist rules?
eBay’s auto-relist system has specific limits that sellers often misunderstand, and running into them unexpectedly can leave inventory sitting in the unsold pile longer than it needs to.
According to eBay’s official relisting policy, auction listings with a duration of five days or more can be auto-relisted multiple times within eBay’s system limits. One-day and three-day auctions are treated as seven-day listings for relist purposes, subject to the same auto-relist system limits. After those eight attempts, the item moves to unsold inventory and you’ll need to relist manually or use Sell Similar.
Auto-relists are free in most categories. The notable exception is vehicles, where standard insertion fees apply regardless of auto-relist status.
| Listing type | Auto-relist limit | Fee status | Notes |
|---|---|---|---|
| Auction (5+ day) | Up to 8 times | Free (most categories) | Treated as standard duration |
| Auction (1 or 3 day) | Up to 8 times | Free (most categories) | Counted as 7-day for relist |
| Fixed-price (GTC) | N/A (auto-renews) | Insertion fee per 30-day cycle | Not a relist — a renewal |
| Vehicles (any) | Up to 8 times | Charged per relist | Category exception applies |
Pro Tip: If your auction item hasn’t sold after 8 auto-relists, don’t just manually relist it unchanged. That’s eight data points telling you something is wrong with the listing itself — price, photos, title, or category. Fix the root cause before relisting again.
One more nuance: if a relisted item sells, eBay credits back the insertion fee you paid on the original listing. That credit applies only when the relist itself generates a sale, so it’s worth knowing before you start adding paid upgrades to a relist.
When should you relist, and how often?
Timing a relist is part art, part data. The eBay Export Community and seller forums broadly agree on one principle: wait long enough that the relist feels like a fresh event to buyers, not a spam signal to eBay’s algorithm.
Seller communities broadly recommend waiting several weeks before relisting most items. The reasoning is straightforward. Relisting too quickly can look like listing manipulation to Cassini (eBay’s search algorithm), which may suppress the new listing rather than boost it. Waiting also gives you time to gather real data on why the item didn’t sell — impressions, click-through rate, watchers — before making changes.
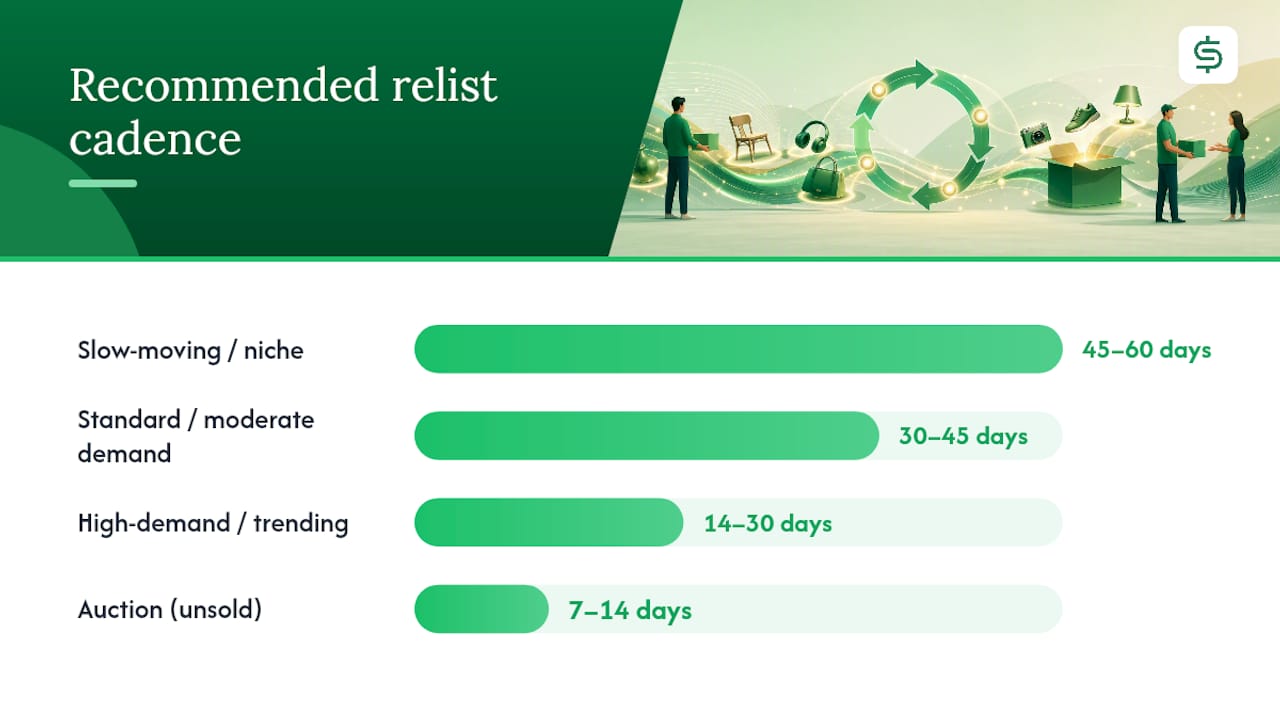
That said, 30–60 days is a guideline, not a rule. High-demand items in fast-moving categories (electronics, trending apparel, collectibles with active buyers) can justify a 14–30 day relist window. Seasonal items are a different case entirely: a Halloween costume that didn’t sell in October should wait until next September, not get relisted in November.
| Item type / demand level | Recommended relist cadence | Notes |
|---|---|---|
| Slow-moving / niche | 45–60 days | Make a meaningful edit before relisting |
| Standard / moderate demand | 30–45 days | Update at least title or price |
| High-demand / trending | 14–30 days | Photo refresh or promoted listing recommended |
| Seasonal | Next relevant season | Don’t relist off-season |
| Auction (unsold) | 7–14 days | Lower reserve or starting price |
Pro Tip: Run a simple A/B timing test. Take two similar unsold items, relist one at 30 days and one at 60 days with identical edits, and compare sell-through at 90 days. One data point won’t be conclusive, but across 10–20 pairs it will tell you something real about your category’s rhythm.
Step-by-step manual relist checklist that actually moves the needle
Manual relisting starts in My eBay under “Unsold” or in Seller Hub under “Manage unsold listings.” Find the item, select Relist, and you’ll land in the listing editor with all original fields pre-populated. Here’s where most sellers make the mistake: they click “Submit” without changing a thing. Don’t do that.
Work through this checklist in priority order:
- Title (highest impact): Add or swap in the search terms buyers actually use. Check eBay’s completed listings for what sold titles look like. Drop filler words (“nice,” “look,” “wow”) and add specifics (brand, model number, size, color, condition keyword).
- Lead photo: The first image is your click-through rate. Shoot against a clean background, fill the frame, and show the item from the angle that answers the buyer’s first question. A blurry or cluttered lead photo kills CTR before a buyer reads a word.
- Item specifics: eBay’s algorithm uses item specifics heavily for search matching. Missing or incorrect specifics are one of the most common reasons a listing underperforms. Fill every required field and as many optional ones as you can.
- Price: Check current sold comps before relisting. If the market has moved, your price should too. A 5–10% price drop can be enough to trigger watcher alerts and move the listing.
- Description: Fix any factual errors, add details buyers asked about in messages, and make sure the condition is accurately described.
- Shipping: Confirm your shipping cost is competitive. Free shipping often improves search placement and conversion.
- Returns policy: A 30-day return policy tends to improve search ranking. If you’re not offering returns, consider whether the category warrants it.
- Promoted Listings: Adding a Promoted Listings Standard campaign at relist is one of the fastest ways to recover visibility for a slow item.
Fee note: if you’ve used up your monthly free-listing allotment, a manual relist will incur an insertion fee. Listing upgrade fees (bold, subtitle, gallery plus) apply again on the relist if you add them. If the relisted item sells, eBay credits back the original insertion fee.
Pro Tip: Before relisting, search eBay for your item’s exact title and filter by “Sold.” If the top sold listings use different keywords than yours, that’s your title fix right there.
How do relist tactics differ by listing type?
Auction listings
Auctions that don’t sell usually have one of two problems: the starting price was too high, or the listing ran at the wrong time. When relisting an unsold auction, lower the starting price or remove the reserve, and schedule the end time for Sunday evening (7–10 PM ET), which consistently draws the most active bidders on eBay. Auto-relist handles the mechanics, but it won’t fix a bad starting price — you have to do that manually before enabling it.
Fixed-price (Buy It Now) listings
For fixed-price items, the relist decision is really a question of whether to relist or just adjust. If the item has had decent impressions but no sales, a price adjustment and a Promoted Listings campaign may be enough without ending and relisting. If impressions are low, that’s a search-visibility problem — relist with a new title and updated item specifics. Ending and relisting also resets the listing’s “date listed” signal, which can give a short-term freshness boost in search results.
- Relist when: Impressions are low, title needs a full overhaul, or item specifics were wrong.
- Adjust in place when: Impressions are decent but conversion is low — try a price drop or promotion first.
Good 'Til Cancelled listings
GTC listings auto-renew every 30 days, so they don’t need manual relisting to stay live. The issue is that a GTC listing that never sells can become invisible over time as Cassini deprioritizes listings with poor conversion history. If a GTC item has sat unsold for 90+ days, end it and relist it as a new listing (or use Sell Similar for a clean break). That resets the listing’s history and gives it a fresh shot at search placement.
What are your options for bulk relisting and automation?
Manually relisting 10 items is manageable. Relisting 200 is a different problem. eBay and third-party tools offer several paths, each with real trade-offs.
Seller Hub is the starting point for most sellers. The “Manage unsold listings” view lets you select multiple items and relist them in bulk. You can apply a price change or other edits across the batch, though the editing options are more limited than the single-listing editor. For sellers with a few dozen unsold items, this is usually sufficient.
File Exchange (now largely replaced by Seller Hub’s bulk tools, but still available) lets you download a spreadsheet of your listings, edit fields in bulk, and re-upload. It’s powerful for large catalogs but has a steep learning curve and no real-time error feedback. A misformatted column can cause an entire batch to fail silently.
eBay’s API opens up scheduled relists, automated price updates, and template-based listing management. Most sellers don’t build their own API integrations, but third-party tools do — and that’s where platforms designed for cross-listing and inventory sync become relevant. These tools can schedule relists, push title and price updates across channels, and flag failed listings before they become inventory problems.
Key risks to manage when automating:
- Duplicate listings: Automation that relists without first ending the original creates duplicate active listings, which violates eBay policy and can result in listing removal or account warnings.
- Inventory sync failures: If you sell on multiple channels and your automation doesn’t sync inventory in real time, you can oversell. A multi-channel inventory management system that updates quantity across platforms the moment a sale happens is non-negotiable at scale.
- Rate limits: eBay’s API has call limits. Automation that fires too many requests too quickly will hit those limits and start failing silently — check your logs.
- Fee changes: Automated relists don’t automatically account for changes in your store subscription or free-listing allotment. Review fee implications before running large batches.
For sellers scaling beyond a few dozen SKUs, the AI-powered bulk listing guide covers how to structure templates and workflows that reduce manual error at volume.
How SpareDollar helps you automate a smarter relist strategy
Relisting at scale without the right infrastructure turns into a full-time job. SpareDollar is built specifically for eBay sellers who want to create one listing and push it across multiple marketplaces without rebuilding it from scratch each time — and without the inventory sync headaches that come with manual cross-posting.
Here’s how SpareDollar’s features map directly to the relist playbook:
- AI-assisted item specifics: SpareDollar’s AI drafts item specifics automatically, which means when you relist, you’re not starting from a half-filled form. Accurate specifics from the start improve search matching on every relist.
- Bulk edits: Update titles, prices, or descriptions across multiple listings at once. No spreadsheet gymnastics, no File Exchange uploads.
- Per-channel pricing: Set a different price for eBay vs. Poshmark vs. Depop without duplicating your workflow. When you relist on eBay, the other channels stay at their own price points.
- Inventory sync: When an item sells on any channel, SpareDollar auto-delists it everywhere else. That’s the duplicate-sale problem solved without a manual step.
- Barcode scanning: For resellers working through physical inventory, scan a barcode and SpareDollar pulls product data automatically — faster listing creation means faster relisting when items don’t sell.
SpareDollar’s sales and profit analytics also give you the sell-through and conversion data you need to decide which items to relist and when — not just the mechanics of how. As reselling has grown into a serious business channel for many U.S. sellers, the gap between sellers using manual workflows and those using integrated tools keeps widening.
How do you measure relist performance and improve over time?
A relist without measurement is just hope. Track these metrics for every relist test:
- Impressions: How many times your listing appeared in search results. Low impressions mean a search-visibility problem (title, item specifics, category).
- Click-through rate (CTR): Impressions divided by clicks. Low CTR usually points to the lead photo or price.
- Item page views: Total visits to the listing page. Compare pre- and post-relist.
- Watchers: A rising watcher count after relist is a positive signal. Flat or falling watchers suggest the listing still isn’t compelling.
- Conversion rate: Purchases divided by page views. The most direct measure of listing quality.
- Sell-through rate: Items sold divided by items listed over a period. The category-level health metric.
- Time-to-sale: How many days from relist to sale. Shorter is better; track it across relist iterations.
- Promoted Listings ROI: If you’re running a campaign, track ad fees against revenue generated.
Run your relist tests like this:
- Form a hypothesis. “Changing the lead photo will increase CTR by a meaningful amount.”
- Pick one variable. Title, price, photo, or item specifics — one at a time. Changing three things at once tells you nothing about what worked.
- Set a measurement window. 14–30 days is usually enough to see a directional signal.
- Record baseline metrics from the original listing before relisting.
- Compare post-relist metrics against the baseline and against similar listings in your store.
- Iterate. If the change helped, keep it. If not, try the next variable.
Seasonality matters here too. A listing that underperforms in February might sell well in April. Build a simple calendar of your category’s peak demand periods and time relists to land 2–3 weeks before those windows open. For pricing decisions, check sold comps weekly during active relist periods — prices in many categories shift faster than sellers expect.
Common relisting mistakes that hurt your account
Most relist failures come down to a short list of avoidable errors.
Relisting unchanged listings. Putting the same title, photos, and price back up after a listing failed is the most common mistake. eBay’s algorithm already has data showing buyers didn’t engage with that listing. Relisting it identically gives Cassini no reason to rank it differently.
Outdated or missing item specifics. eBay periodically updates required item specifics by category. A listing that was complete six months ago may now be missing fields that affect search placement. Check item specifics every time you relist.
Over-relying on price drops. Dropping price is the easiest lever, so sellers reach for it first. But if the problem is a bad title or a weak lead photo, a price drop just means you’re selling for less without fixing the root cause.
Creating duplicate active listings. Relisting before ending the original creates two live listings for the same item. eBay’s policy prohibits duplicate listings, and the algorithm may suppress both. Always confirm the original is ended before relisting.
Relisting in the wrong category. If an item didn’t sell, the category might be part of the problem. Check where similar sold items are listed before relisting in the same category automatically.
Misusing cross-posting without inventory sync. Listing the same item on multiple platforms manually, without a sync system, is a recipe for overselling. When you sell on eBay, the Poshmark listing needs to come down immediately.
Watch your account health dashboard for rising defect rates, late shipment flags, or listing policy warnings after any bulk relist campaign. Catching a problem at one or two listings is a quick fix. Catching it at 50 is a project.
Three relist strategy templates you can copy and test
Template A: Conservative (slow-moving or niche items)
- Wait 45–60 days after the listing expires or ends unsold.
- Review sold comps and update price if the market has moved more than 10%.
- Rewrite the title using the top keywords from recently sold listings.
- Fill any missing item specifics.
- Relist and run for 30 days before evaluating.
- Stop signal: If impressions are still low after 30 days, use Sell Similar for a full reset.
Template B: Aggressive (high-demand or trending items)
- Wait 14–30 days after the listing ends unsold.
- Refresh the lead photo — shoot a new angle or improve lighting.
- Add or increase a Promoted Listings Standard campaign (start at 2–3% ad rate).
- Adjust price to match the current lowest active comp.
- Relist and monitor CTR and watchers daily for the first week.
- Stop signal: If watchers increase but no sale after 14 days, drop price by 5% and reassess.
Template C: Automated (high-volume sellers with 50+ SKUs)
- Set up a relist workflow in Seller Hub or via a third-party tool with template-based edits.
- Apply a standard title-optimization template across the batch (brand + model + condition + key spec).
- Schedule relists to go live Sunday evening for maximum early-week visibility.
- Monitor conversion weekly via Seller Hub analytics or your tool’s dashboard.
- Flag any listing with zero impressions after 14 days for manual review.
- Stop signal: Any listing that fails to sell after three automated relist cycles gets pulled for a manual overhaul.
| Template | Relist window | Key edit | Monitoring cadence | Risk level |
|---|---|---|---|---|
| A: Conservative | 45–60 days | Title rewrite + price check | Every 30 days | Low |
| B: Aggressive | 14–30 days | Photo refresh + Promoted Listing | Weekly | Medium |
| C: Automated | Scheduled | Template title + price batch | Weekly (automated) | Medium-high |
One thing most sellers get wrong about relisting
Most sellers treat relisting as a mechanical task — find the unsold item, hit Relist, done. The listings that actually sell after a relist are the ones where the seller stopped and asked: why didn’t this sell the first time?
The answer is almost always in the data. Low impressions mean Cassini couldn’t match the listing to buyer searches — a title and item-specifics problem. Decent impressions but low CTR means buyers saw the listing and kept scrolling — a photo or price problem. High CTR but no sale means buyers clicked through and weren’t convinced — a description, condition, or trust problem.
Relisting without diagnosing which of those three failure modes you’re in is the single most common seller mistake. A price drop fixes the third problem, not the first. A photo refresh fixes the second, not the third. Match the edit to the actual failure mode, and your relist success rate will climb faster than any timing trick or automation shortcut.
One more thing: don’t underestimate the value of a clean, consistent listing across every channel you sell on. Buyers who see your item on eBay and then find it on another platform with different photos or a different price lose trust fast. That’s where a tool like SpareDollar earns its keep — consistency isn’t just aesthetic, it’s a conversion factor. (And yes, SpareDollar keeps your listings consistent so you don’t have to — consider it the dad who actually reads the instruction manual before assembling the furniture.)
SpareDollar cuts the manual work out of your relist workflow
Relisting smarter means spending less time on mechanics and more time on the edits that actually drive sales. SpareDollar’s eBay integration lets you build one optimized listing, push it across marketplaces with per-channel pricing, and sync inventory in real time so a sale on one platform pulls the listing everywhere else. The AI-assisted drafting handles item specifics automatically, which means your relists start from a stronger baseline every time.
In your first session, you can connect your eBay account, import existing listings, and set up a bulk relist workflow with template edits applied across your unsold inventory. No spreadsheets, no File Exchange uploads, no manual channel-by-channel updates. See what SpareDollar automates for your store at SpareDollar.
Sources
- Relisting items
- How to relist items
- eBay Export Community
- Crosslist introduces cross-listing platform designed to help resellers scale across multiple marketplaces
- How online reselling is becoming more than a casual side hustle
FAQ
What is the best way to relist an eBay item?
Relist from Seller Hub’s “Manage unsold listings” view, edit at least one meaningful field (title, lead photo, or price) before submitting, and confirm the original listing is ended first. A relist with no changes is rarely worth the insertion fee.
Is it worth relisting items on eBay?
Yes, with a targeted edit. Items that didn’t sell usually have a fixable problem — a weak title, missing item specifics, or an uncompetitive price. Relisting with that fix applied gives the item a genuine second chance rather than just recycling a failed listing.
How often should you relist an item on eBay?
The seller community broadly recommends waiting 30–60 days for most items before relisting, with shorter windows (14–30 days) for high-demand or trending products. Relisting too frequently without changes can suppress search placement rather than improve it.
What is the 3-day rule on eBay?
The “3-day rule” refers to eBay’s treatment of 1-day and 3-day auction durations: for auto-relist purposes, eBay counts them as 7-day auctions, applying the same 8-auto-relist limit as longer-duration listings. It’s not a separate policy — just how short-duration auctions are categorized in the relist system.